This will be a several part blog in which we talk about Facebook Events. We will start with the basics of setting up an event, hosting the event, promoting the event, and finally.. how to successfully close the event!
Social Media is slowly, but surely taking over the ‘home party’ market at the new and innovative way to have direct sales parties. While many of us still enjoy getting together for a Girl’s Night Out and having a fun in home party, our schedules, our commitments, and our families sometimes make it impossible to get together for a night out with our friends.. so here comes the virtual party!
This segment is going to be a step by step tutorial to get your event set up on Facebook. I have selected Jewelry in Candles for this event.
https://www.jewelryincandles.com/store/danareh
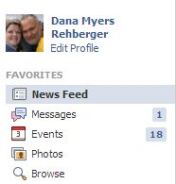
1: Go to your Facebook Profile, look to the left under your profile picture and you will see the event link:
2. Click the little EVENT tab and it will take you to a new screen with a calendar. This will show you all events that are going on and that you have been invited to participate in. Right under you notifications, you will see a tab that says, “Create Event”, click it.
3. When you click create event, you will get a pop up (make sure you have your pop ups enabled).
4. Fill out the pop up.. give it a snappy title, tell your guests what the event will be about. If this is coinciding with an at home event, post the address. Give it a date and make the decision if your guests can invite their own guests. It should look something like this. When you have it filled out, click “Create”
5. You will then be taken to your event page.
6. It is a little bare looking, so let’s dress it up a little by adding an event picture. To do this, locate the tab that says “Add Event Photo”
7. You can either use a photo that you already have on Facebook or you can upload a photo. I’ve decided to upload a photo.
8. Once your have your photo just like you want it, click save changes. I recommend adding a photo because it makes your event look more official and less ’empty’.
So, now your event is created.. tomorrow we will talk about getting your event ready to invite your guests and some of the pros and cons of having an online event. Stay tuned!!!


Helpful article!
Great step-by-step instructions for setting up an event. I’m looking forward to your next article since even though I know how to set up FB events, I’ve never quite cracked the code on how to make the best use of them.
Thanks for sharing. I have been on Facebook for quite a while but still don’t know how to set up an event.
Very Informative!
http://fabulousperks.blogspot.com
Great step by step guide. I bet it helped a lot of people.
I’ve never “organized” a party on Facebook, but these tips are pretty amazing and easy to follow 🙂